I am not sure how many of you have seen Wunderlist (it's an app as well as online) but I wanted to take a few minutes to show the organizing tool to you.
I added the Wunderlist app to my iPad a few years ago and I decided to start using it for a method of organizing my collection development. When I preorder a book, I add it to the list with the day it comes out and I add a note about where I ordered it from. I keep all of my records of orders on a spreadsheet, but, a spreadsheet isn't going to remind me of the day I should start seeing it arrive.
Wunderlist allows you to put notifications on your desktop, like a calendar and it will popup a reminder when you are close to the deadline. It allows for a reminder and a due date.
It is also a great tool to show students so they can learn to task manage. Task management on project based learning is very important and using a tool such as Wunderlist can really help them learn to organize and plan their tasks. What is awesome about the tool is the capability of inviting friends to the tasks. So, if you, as the teacher assign a project, you can invite all of your students to the different tasks and they will get the notifications and be able to refer to the assignment on their own.
If you are in the need of becoming more organized, take a look at this site. It offers a lot of possibilities for your classes or you.
Friday, December 27, 2013
Tuesday, December 24, 2013
From the Archives: Ways to organize my tech life
With the dawn of the new year, I have been thinking hard about ways I can organize my technology life, my library life and my teacher life. I think I will start with my technology life. That seems to be the area where I find fantastic ideas but sometimes forget them.
Here is how I start things and what I need to do. I tweet. A lot. I favorite tweets with links of interest and they send themselves magically each day to my diigo account. The problem is I forget to go to Diigo and sort them. Mistake one. I logged into Diigo today and there were close to 1000 tags I need to sort. So, my tech goal is to do the following: Each week, be it Sunday or Saturday I need to go through my new tags, check out the links and sort them. I need to post the most important links on pinterest. Why, you say? On pinterest, I can see a visual. Sometimes seeing a visual helps me remember more about the link.
That's another thing I need to do. Organize my pinterest. When I started using it, I had a few boards for recipes, ideas and such but I have discovered after a year on the site, I need to reorganize. I have a lot of jumbled boards that I need to re-define. I think doing that will make my boards so much more orderly and easy to track things.
Using technology has so many benefits to teaching, libraries, and kids but, to use it right it has to be orderly. That is my goal for this year. Organize my tech life. Perhaps I will come across some fantastic ideas I found years ago.
Friday, December 20, 2013
A wrap up of 2013
So, as 2013 comes to a close, it's time to reflect upon the many tools and tricks I have found this year. There are many of them... but, some of them stick out in my mind as my best tools of 2013. I am only posting six, but believe you me, there are many many more. These are my go to tools.
1. YouTube I never really realized the power of a good video. YouTube has changed the way I have taught a foreign language. There are so many great videos out there, why reinvent the wheel? I say, check there first and then expand as needed. Kids will remember the videos and they will learn from them. It doesn't take a lot of time to find the videos either.
2. Pinterest/ Learnist/ Educlipper I have added all of these into one because they all accomplish similar things. They create a bulletin board for sites, images, and links. I use all three of them and I have gotten so many ideas from them. I spend a little time (maybe 10 minutes) a week scanning the three sites/apps to find ideas for the library. It is amazing the things people in my PLN are doing. I have borrowed a lot of tools for my class via these sites.
3. Twitter Need I say more? The best PD in the world comes from Twitter. I have found so many connections and so many people who share my experiences. I am the only LMS in my school and I am the only tech coach in my district. I have built a strong PLN and have learned more from people here than from any PD offered to me elsewhere. Every single teacher needs to be on twitter, even just to scan other people's posts.
4. OneNote I have started inputting information left and right into OneNote. I use it on the Skydrive and sync. I love being able to work anywhere on my items and having access to it at all times. Collaborating is also a great part of the program.
5. Google Forms I have built a lot of surveys using google forms. I use them to establish tech tickets for kids, to log my personal hours doing tech (it helps the treasurer decide where to budget my salary) and I have forms for library surveys. I have found that they are easy to make and easy to share and the instant results and graphs that can be built right on the site are easy ways to share data immediately.
6. Dropbox Last, but certainly not least- Dropbox. I use it daily. I share folders with students, coworkers, family and friends. I love having it on my phone, iPad and computer. Everything I do is added instantly into one place. I store photos, files and even whole ebooks there. My assistant and I work on files together and Dropbox helps make that happen.
These six tools have been an integral part of my daily life. I have used them often and honestly don't think I could live without them.
The next two weeks of my blog are archived stories. I am taking a few weeks of much needed rest to read some books, watch some movies and spend time with the kiddos. Maybe even go sledding a little. Have a safe and happy holiday season!
Tuesday, December 17, 2013
Choosing an online education platform
The last few weeks, I have been spending hours upon hours searching for the right solution to online learning for our students who need credit recovery and courses due to scheduling conflicts. I never realized how difficult it is to evaluate and how many platforms there are out there.
Of late, we have had our regular education students doing a program with live teachers through a state program. Our special education kids have an online platform that self grades. We pay the live program per class and each student does their work and have someone grade it. I have been really frustrated with this method lately because our students are being expected to keep working but don't get a direct response or grade. They never know how they are doing and how far they have progressed because the teachers have teaching jobs and do this as an extra special. Face it, they are all busy too, we all are.
So, I started looking for something that can be controlled in house and is comparable to the classroom environment, especially with content. The online platform we have been using for our special education students isn't as content heavy and the kids who are stronger students won't get a challenge from it.
My process began by starting a thread in several state tech forums. I wanted to know what others have found to be helpful and what others are using. I needed to know what people thought and how the programs worked for them. I understand that every situation is different, but there are a lot of schools out there using online education and a lot of them are finding great success with it.
My endeavor has led me to about 4 programs that meet our needs. I have spent a lot of time doing meetings with their representatives, pilots, sample classes. I have found that there is a lot of great stuff out there. Some of the platforms are very user friendly and can be modified and edited to accommodate the needs of every student. It can be edited to match the curriculum the school district is using. A lot of these tools are very impressive and exciting. The cool thing is the cost difference! We can get kids in online classes every class period for a site license fee and save a lot of money on online learning. We can do great things offering this. With so many colleges offering online classes and so many options in life being online, doing this makes for a lot of opportunities for kids to build needed future skills.
I am excited to be a part of the evaluation process. I look forward to seeing the outcome.
Friday, December 13, 2013
From the Archives: Realtimeboard
I am all about students collaborating. I think it's one of the most important parts of education. Kids need to be able to learn to work together and share ideas, as it's part of their future when they graduate and move into their adult life.
Realtimeboard is another tool that provides collaboration options. It is free and can link to google. You, as the teacher creates a board and invite kids to access it. They also upgrade teachers to PRO for free. (Follow this link)
This site is set up a lot like ConceptBoard, which I showed in a previous post. It's collaborative, uses invitations to access boards and is easy.
I can see this working in a project based learning setting. Students can conduct their research and use the site for a final project. Maybe a history related search or a biography project. It is also a way to organize yourself. There are several mind mapping methods and organzining tools. When you create a new board, you see several templates that can be used for different things.
It could also be used for a foreign language classroom to make vocabulary boards. Kids can locate images of vocabulary and the shared boards can be used by the teacher as a review tool.
The possibilities for this program are endless. There are a lot of things that can be used in the classroom.
Student study groups with Thinkbinder
As a foreign language teacher, I find it incredibly important to have collaboration between students. Sometimes with me, sometimes together. Regardless of the topic, I want them to be able to work together.
I found Thinkbinder, a free tool where kids can "meet" virtually and review materials, collaborate, do projects, etc. as a group. It is an easy to use tool as well.
Start off by creating an account and generating a group. Once you are in, you invite members to the group and they login and join. It is a little like Edmodo in the aspect of group codes and moderation by a teacher. Once the kids are in, they can add files, collaborate, work together. It could be used for many different things: project planning, review for tests, small group meetings to do a task, the list goes on and on.
Check out this site. It's free and easy.
Tuesday, December 10, 2013
Make that fun video
I don't often do commentary about iPad apps, namely because not everyone has an iPad, but, when my co-worker showed me Touchcast, I had to share it. Touchcast is an app on your iPad (sorry android folks, it's not available.) that lets you make a creative recording. It has a green screen, the capabilities of adding a moving background or adding an image for the background. Why do the typical boring video when you can make something special this way.
I made a quick video to share with students information about our Doctor Who theme. It was easy to use and a little addicting. (I think I spent more time playing with bells and whistles than I needed to, but who wouldn't!?) I am going to add it to the class set of iPads I have in the media center for the seventh graders to use for their book talks. I am going to start doing video chats about books as well.
What I liked about it is the numerous types of products one can make. It has a business report, a new report, a how to setup, just to name a few. You pick the type of video you want to make, add some text and record. It puts the text directly onto the screen and it has a ticker that runs across the bottom with current events. It's really cool. There is even a TelePrompTer tool that scrolls your content.
The app also links to several social media sites and allows for posting videos on YouTube, Twitter and Facebook. I have decided I am going to take a new twist to doing some of my promotional videos. Right now, I use Animoto and add images of the new releases, the books we are sharing or book clubbing, but, with this app, I can make an actual press release type video. According to the site, there is soon to be a desktop version available. I will certainly check back for that one! Imagine using my desktop to make a video. Just like in the newsroom. I can't wait.
Touchcast is fun and it's FREE! Can't beat that!
Friday, December 6, 2013
Using educanon to make Q/A videos
As a member of edweb.net, I get several digests each day and lately, the bulk of them have referred to a site called educanon that teachers are using to make the flipped model more inviting, more accountable and more specific to the needs of the kids.
Educanon takes your YouTube video and allows for insertion of questions to assure students are paying attention and learning something from the video. A lot of mentions lately are by teachers who are flipping their classroom or considering the flipped model. They are making videos galore and inserting lots of questions to check for understanding.
I decided since I was using a flipped model, somewhat, in my French class, I wanted to give it a shot. I made a few video clips that had some questions inserted. It was easy to use and the fact that it's free is even better.
If you look at the images I posted, you see the video I selected and the questions I added. You can also see there is a desktop, per se, where you assign work to specific classes. All of your videos are placed in a queue and you select one to send to a class. It is very simple to do. It seems to me that it takes longer to preview the video than to do the activities with it.
I think if someone is going to consider flipping a class, this site is a smart move to generate questions and answers. It will certainly hold kids accountable and show the teachers what kids know. I am going to start implementing videos into my classroom.
Tuesday, December 3, 2013
A Doctor Who Themed December
With a new season of Doctor Who quickly approaching, my assistant and I decided it would be great fun to create a Doctor Who Themed month. We decided to pull books that cross several of the genre Doctor Who represents: Time Travel, Science Fiction and Historical Fiction.
Doctor Who has become a classical cult icon to several of our students and staff. There are numerous Whovians amongst us who have our favorite character, favorite Doctor (Mrs. Wells thinks David Tennant is the best) and even favorite episode. Our devotion to the Doctor led us to our December Theme.
Because Doctor Who travels through time in his TARDIS (for non Whovians, a TARDIS is a machine shaped like a Police Box that is enormous and never ending on the inside, think of Hermoine's purse from Harry Potter but capable of transporting through space and time. Doctor Who and his companion travel to various points in history to solve problems and outrun Daleks and Weeping Angels. Long story... you have to watch to see. ) Since we moved our collection to a genre style, we pulled titles that Doctor Who would experience- historical fiction books set in various eras (We pulled Chain by Anderson, A Northern Light by Donnelly, The Springsweet by Mitchell, Crispin by Avi, just to name a few.) We also grabbed some Science Fiction books that fit a typical Doctor Who experience (Delirium by Oliver, Ashfall by Mullin, Starters by Price, Search for Wondla by DiTerlizzi, and XVI by Karr.) Our final genre of choice was none other than Time Travel. We grabbed books by James Dashner, Margaret Patterson Haddox and The Time Traveler's Wife. We even shared the new Infinity Ring Series.
On Friday, we decided to have a Doctor Who themed day, wearing our Doctor Who shirts and maybe a Fez. Cause like Books, Fezes are cool.
So, Read a book: As Doctor Who says, "We are all stories, in the end just make it a good one!"
Donna Noble has left the library, and Donna Noble is safe!
Tuesday, November 26, 2013
I'm on a Blogging Vacation
Because of the Holiday week and needing a little time to de-escalate and relax, I have decided to take a week off of my blog. I am planning to post again December 3. I am really unsure of the topic at this point, maybe more on 1:1 or maybe something about online classes and my current search to find a program that is best for kids.
Have a blessed Thanksgiving, enjoy time with family and be safe at the mall on Friday.
See you next week!
Have a blessed Thanksgiving, enjoy time with family and be safe at the mall on Friday.
See you next week!
Friday, November 22, 2013
Our themes so far this year
My assistant and I have been constantly trying to create new and innovative ideas to get kids to the media center and to get them motivated to read. We were fortunate enough to be able to get some buy in from the kids for a few of the programs we thought about doing. We have started hitting this goal hard this year because we were finding a lot of great titles but not a lot of kids enjoying the books like we felt they should. We spent some time collaborating and talking to a few kids and searching our Pinterest account and got some fantastic ideas.
First off, we started doing monthly themes with displays. We had done boards and posted covers and ideas but never created a specific display to go with it. We also didn't have a blog or a site that we updated often with things. Secondly, we have had some release themes. (Some of our Seniors even welcomed House of Hades by Rick Riordan by wearing togas.)
In August and September, we had a ReadBox with books that have hit the screen (both big and televisions) and saw several titles, young and old fly off the shelves. We put together the display and a bulletin board to match. It was neat to see kids coming in and gravitating to a display that had some new titles.
The second full month of school was October so we hit the Zombie theme head on. We made a cryptic bulletin board loaded with visuals of titles and creepy things. Our school had a special zombie program where kids tried to turn others into zombies. It fit perfectly with our theme and we even saw a few students go die hard and dress in Zombie clothes and makeup for Halloween. (Only those who had been turned wore the clothes, however.)
We rolled into November with a theme for males- we thought of No Shave November and decided to pull titles that boys would enjoy and place them on the shelves. We made a catchy theme and added a selection of titles to the spindle. We decided to shorten November because my assistant and I have a love for Dr. Who.
With that in mind, we decided to end November and roll into December with a Time Traveling Theme. We have found a large amount of Historical Fiction and Time Travel genre that don't circulate, so we pulled several from those genres and are building our own Tardis with some Daleks and Weeping Angels for display. We decided the theme would be a tribute to the debut of the next season of Dr. Who which starts tomorrow. (Photos to come, as we have designed and built our Tardis, but it is unfair to display it before the actual date.)
We have some great ideas for things to come. Keep checking back as we will be adding more of our ideas soon.
Tuesday, November 19, 2013
Keeping a Fresh Collection
One of the things I absolutely pride myself in is collection development. I have told my readers time and again how much time and effort I spend researching and organizing my ordering, my wish lists and my collection to make it fresh and new. I decided it was time to share my tricks of the trade. Be aware, I only have a small budget. I get about $1700 a year for new materials plus a small amount of high ability money to use for additional items. I also host two book fairs a year and get a lot of titles from Scholastic. I have some other potential leads as well, but I haven't yet developed them.
Because of the limited budget, it is often hard to get a lot of new books. But it never fails, the kids come in and look around and often focus on one spot, my new release area. I have two spindles with new releases. We keep them out for three weeks and do a cycle with the way we do them.
We seldom put out non-fiction unless we come across a title that people would read for pleasure. (We talk to kids and get ideas from them about whether or not it would be read just to read or if they need it for a paper.) We rotate spindles every Tuesday and make a short Animoto video with the newest titles. Those are added to the library learning commons blog and shared on Twitter (which posts it on the library Facebook page too).
Friday, November 15, 2013
Blendspace for class flipping
My edshelf connection is turning into a goldmine for new tools to use in the classroom. One such tool I came across was Blendspace.
Blendspace is a board per se, that allows users to add video, text, quizzes, and more to make the flipped class experience even more in depth. It is very well organized and easy to use. Some may remember edcanvas, this is now blendspace.
I sent a copy of a canvas/board to my French 2 class and I loved how the page worked, looked and assessed. I was able to embed several videos to the site and then add a quiz at the end. Even if the quiz is treated more as an exit slip, I am still going to see how much information the students have obtained and maintained.
The blendspace platform allows users to connect to many different web based tools, including dropbox, vimeo, google drive and educreations. I can see, with the educreations component being an add-in that a teacher who uses that program for flipping a class will find a great deal of ease and success pulling tools for student use.
I am really impressed by how easy and quick this is to use. It takes very little time to establish a space, add documents and information. I am excited to see how it works for my classes.
Tuesday, November 12, 2013
A new way to flip a class
A few months back I joined edshelf, a site that builds collections of apps and tools for different needs. Being a member of the site, I get a weekly (sometimes more often) email with a list of tools that have recently been added to the site. I happened to read the latest email I received and noticed there was a new app/ site called edpuzzle. I thought perhaps it was a site to make games but I checked it out and saw something that appealed to me a great deal: a site that allows videos to be clipped and modified and add voice overs and questions. I immediately thought about my French classes and how I could use it with them.
As I have mentioned before, I am working on flipping my French class. I was searching for something I could use to show the kids videos but also assess them to see what they have learned. I think this site would really help me do that.
After an account is created, classes can be made and so can assignments. You can pull videos from Khan Academy, YouTube or LearnZillion and build assignments with them. What a great tool to assess and teach together.
If you are doing a flipped class model or trying to differentiate your instruction, this may be the way to do it. Take a look at this site, it's free, seems easy and probably will do a lot of good for classes.
Friday, November 8, 2013
Tagmydoc.com
One of my daughter's teachers showed us an assignment she was working on but the entire assignment was started with a QR code. The kids were scanning the code with their iPods and it was opening a PDF file that had their task. I was really intrigued by the whole process so I asked her teacher to share with me how it was being done.
She told me they were using a program called Tagmydoc. It generates a QR code and a PDF for the file and opens it on the device you are using. It is designed to save paper. One can create a free account and have up to 50 tags open at once. There is also a way to earn 10 more free tags by completing a few tasks. It's a very simple program to use, merely create an account and upload documents. After it's uploaded, you can download the document or just the tag. The document can come from the computer or from your google drive.
As a school librarian, I am highly considering using this program for a marketing tool. I made a google presentation about the state award books. I am thinking I could make a tag for the presentation and post it near the books so kids can see about them. I am also thinking that when I have monthly themes, I will get a few reviews for some of the titles and make a tag kids can access to learn more about the book.
I uploaded our student broken computer report form and made a tag for it. It was simple and fast. I can stick it on the wall and kids can scan it and have their form filled out before they come to me. Easy.
I think a classroom teacher who is attempting to go paperless will find a lot of use with this. Fifty tags that can regenerate when a file is removed can make things work well for anyone.
Tuesday, November 5, 2013
Marketing my Library
Part of the responsibility of being an effective school librarian is making a library a place that is welcoming and accommodating. It is also important to spend a little time marketing the library to everyone who should be using it.
Since my French classes are dwindling and fading out, I have had a little more time to focus on that very thing: Marketing the library. I spent my summer developing some ideas and ways to make the library more visible to everyone, including students, teachers, community and beyond. I decided early on that I was going to start a blog or a website to promote what we are doing. I also decided I needed to promote our new releases and our current programs. I spent a lot of time organizing Aminoto videos and making google presentations that can be embedded into numerous platforms.
I decided to use Blogger to create my website. I started with Google Sites, but I didn't like the idea of the page just growing and not making a nice archive on the sidebar. Blogger allowed for an archive so people could only see a limited amount of information and be able to look to the side for more. I wanted information to remain and not be deleted. I looked at other sites as well, but since I use Blogger for my main blog, I found it easier to build it all there.
I made a fancy movie about getting to know the library. It is merely photos of different places. I have done several screencasts as well. All of them are posted on my library YouTube channel. My goal is to market as well as teach everyone. I started doing Tech Tuesdays this year, inviting teachers to come to the library to learn tools. I have been sending the students emails with little tips and tricks. I even started making little surveys to get kids to check their emails. We give away little prizes here and there for answering the surveys.
Aside from making videos, I make a lot of signage and do a lot of advertising on social media. In fact, I am a little bit of a social media guru. Everything is mingled. I post on one, then all the others post the info. I have placed QR codes around the library and other parts of the school. Hopefully my students are accessing the information and looking at what we have.
It takes a lot to make the school library a place for everyone and hopefully, these little efforts of mine will make mine an even better place.
Friday, November 1, 2013
Marketing my State's Award books
This school year, I have made a dedicated point to spend more time marketing the library. I have been very focused on doing whatever it takes to increase student library usage. I have spent a lot of time checking out things other people do, talking to other media specialists, googling ideas, attending webinars, twitter chats and conferences; whatever it takes. I am finding that my efforts are not only fun, but starting to pay off.
It started when a colleague sent a message on the Indiana Librarians listserv asking for ways schools were promoting the state award books. I had been doing a few things in the library and getting them interested, but her challenge drove me to find some other outlets. I decided to start making videos.
I spent a little time walking about the media center looking for pictures of the books, the signage, the prizes (I give away prizes via drawing for voting on the books.) and where to find the materials. I used my trusty Animoto account and voilà , a quick, fun video that identified all of the things we had to offer. I shared it with my YouTube account and emailed it to all of the students. They saw what I had to offer and what we were doing for the students who participated.
When the second nine weeks started, I posted a new video, featuring the winners from round one, the prizes we had and how they could win. I posted the video on YouTube and sent it to the kids. I am seeing a lot of positive changes in circulation. Last year only 8 of the state award books were checked out and voted upon. This year, I have already had 30. *I know this sounds like a very low number but in a school of 200, it is a good percentage.
I am not sure how much impact my newly found marketing strategies will work, but I am sure with time, persistence and a little patience, the students in my school will have a part in voting for the Indiana nominated books.
Tuesday, October 29, 2013
Use edshelf to organize your apps
A few months ago, I stumbled upon a site called edshelf that provides educators with a platform to save apps and websites for later reference. I created my account and started investigating the site and the potential it has for my personal needs.
It allows educators to create collections to save tools that are needed for their classroom.
It is a little like livebinders but for apps and web 2.0 tools. It doesn't save links, it save tools one could use for the classroom. It allows for numerous collections so if one has different content areas or different classes and had specific needs for each, collections could be created to use later.
One aspect I discovered that was helpful is the dashboard that outlines new users, what they have been adding, the collections they are making. I is a little like a twitter feed with links. Each of the collections is accessible by everyone and links can be copied to one's own edshelf collection.
I am going to use my edshelf to establish a Tech Tuesday collection (*tools to share with teachers), a blogging collection (*tools I can blog about) not to mention a few others. I am certain I will have a great deal of success with this site and I can already see some potential uses.
Friday, October 25, 2013
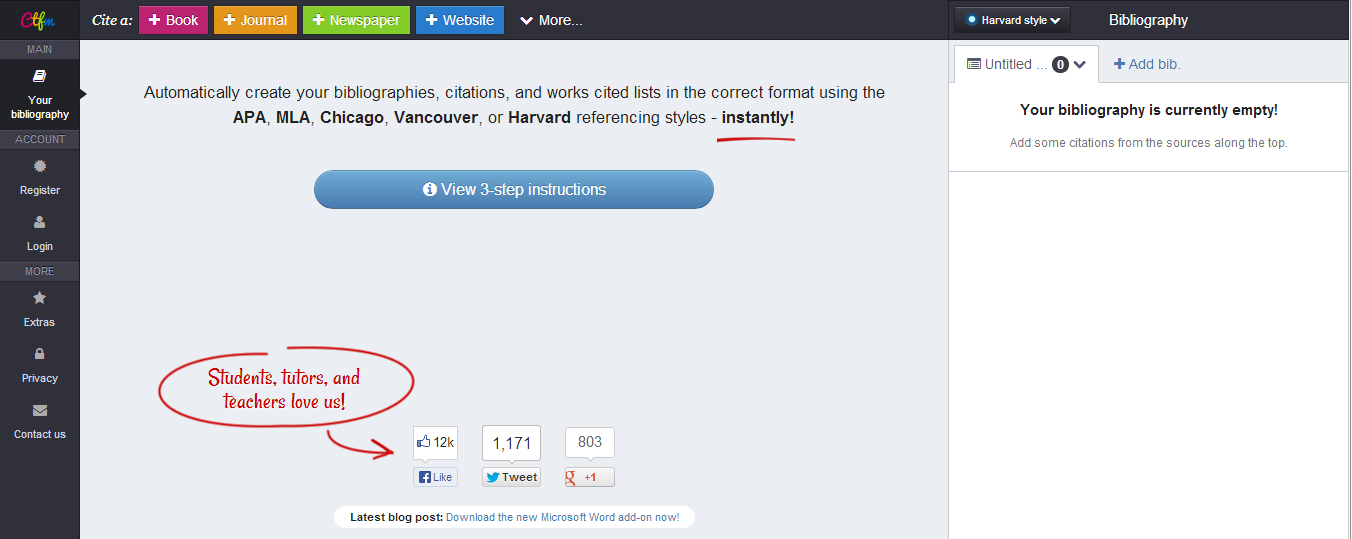
Citing sources Part 2: CiteThisForMe
To wrap up my series on Citations, I end with a great, easy to use cite for citing sources and creating a personal bibliography- Cite This For Me
I learned about this site from a librarian on my PLN. We were doing #TLCHAT one evening and someone asked a question about citations. The librarian mentioned sending students to this site to record their information for their papers.
I actually sent a few kids there recently and they found it very simple to use and easily accessible. Users go there and create a citation for their topics. It generates a bibliography that is downloadable at the end. The student I sent there was very unaware of how to do a citation, but after I sat with him and walked him through it, he seemed pleased with how easy it was to use.
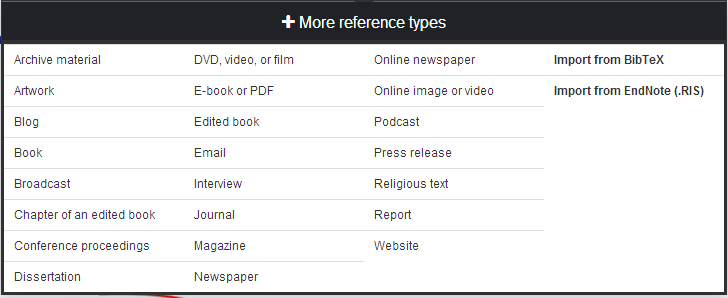
If you look at some of my screen shots, you will see how many different options there are for citation building. It covers all of the major book types.
The site itself is visually appealing and easy to use. There are several options available to use for your paper.
After you create a bibliography you can access it on the site. It is a very simple way to create your works cited page for a paper.
I encourage everyone to take a look at something such as CiteThisForMe as a way to organize and create an accurate works cited page.
I learned about this site from a librarian on my PLN. We were doing #TLCHAT one evening and someone asked a question about citations. The librarian mentioned sending students to this site to record their information for their papers.
I actually sent a few kids there recently and they found it very simple to use and easily accessible. Users go there and create a citation for their topics. It generates a bibliography that is downloadable at the end. The student I sent there was very unaware of how to do a citation, but after I sat with him and walked him through it, he seemed pleased with how easy it was to use.
If you look at some of my screen shots, you will see how many different options there are for citation building. It covers all of the major book types.
The site itself is visually appealing and easy to use. There are several options available to use for your paper.
I encourage everyone to take a look at something such as CiteThisForMe as a way to organize and create an accurate works cited page.
Tuesday, October 22, 2013
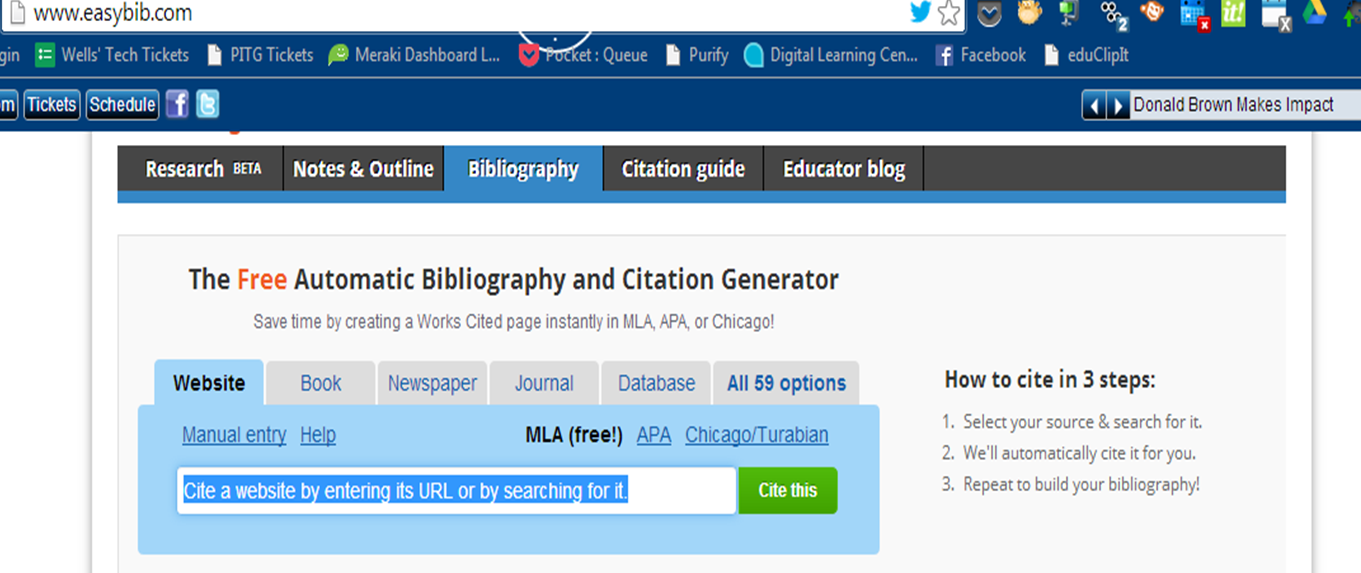
Citing sources Part 2: Easybib
To continue my series about citing sources, I am going to delve into the world of another online cite that assists the writer in the art of citation. (Yes, I call it an art because it takes talent to master the skill. Many of our students are lacking that skill and need to have it drilled and added to their brains more often than once a year. It is a skill that needs to be adapted, utilized and practiced frequently.) My site today is: Easybib.
I learned about Easybib a few years ago when I was teaching a senior project class which involved writing a super intense research paper. I learned about it when I had my iPhone and someone told me to download the app and try it. I did and I loved how it worked. Scan a barcode and get the citation. Easy as that.
I checked the website and found it just as easy to use. It offers the researcher both guides to using a citation as well as offers ways to build the citation page. It is very simple for the researcher.
You merely decide the format *APA, MLA, etc. and plug in the information. It does the work for you. Is it going to teach kids what they need to know? No, but, my thought about this is; who is going to sit down in real life and develop a citation based on the current MLA format? Who is going to read through a guide and go step by step to build it when every database has the entire thing? I wouldn't. If I had some of these wonderful sources to use when I was doing my numerous college papers, I would have absolutely taken advantage of it.
With that being said, Easybib is just that- Easy! It can do a lot to help the research process. I also noticed it adds a special toolbar to Chrome to allow you to tag sites as you access them. Talk about easy!
Friday, October 18, 2013
Citing sources Part 2: OSLIS
My English teacher colleague grew up in Oregon and this site was highly regarded by the locals for its ease of use and factual information. When she moved to Indiana, she brought the information with her and sends her students here to do their citations. It offers users a simple format to get started on a research process. There is also a location to cite sources. Unlike the Purdue cite, OSLIS has it's own citation maker.
Users merely search for a specific format on the sitebar and input the necessary information. Voila, you have a citation. The hardest part here is training students to log the right information. If we start them young, and continue the process, they will learn it and master it.
A few things to note, the graphics are a bit elementary. I can already imagine a high school student telling you it's immature and such because the graphics are child like. I just tell them the information is good and worthwhile so just use the site!
Next in the series: Easybib as a means of citing.
Tuesday, October 15, 2013
Citing sources Part 2: OWL
I am not sure how many people are familiar with Purdue University's Online Writing Lab, but, as a teacher in the Hoosier state, it is often a go to site for numerous teachers as students work on papers. One would not really consider Purdue, a university known for Veterinary Science, Agriculture and Biology to be stellar in the area of English and citation, but this site is amazing.
The site has a lot of tools for the classroom teacher as well as updated information about style guides and formatting of a paper. It allows for the user to get find up to date information about the different writing styles. The site does not make the citation for you, but it teaches you the steps to make it correctly.
The tab for 7-12 teachers guides users through the writing process. It has many links that relate to different writing topics to help get writers started. It also has an up to date MLA and APA writing style guide to get writers started in the research process. There is also a very handy guide to avoiding plagiarism. I recommend if you are teaching the steps to research, you start kids here. It is a great tool for the actual process of developing ones own works cited page and in text citations. If you teach the steps and train students to do the process on their own, this is the place to start.
In my next post in the Citation series: OSLIS to do citations.
Friday, October 11, 2013
Citing sources Part 2: Citation machine
I have been requiring students to write papers of some sort for years. I have required papers in French class, in library media class and in Journalism. All of which have required students to conduct research and develop citations. The second phase of my Citing Sources series is going to talk about some of the different websites students and teachers can use to cite information. There are many of them out there, but only a few of them are used by myself and staff members at my school so those will be my focus.
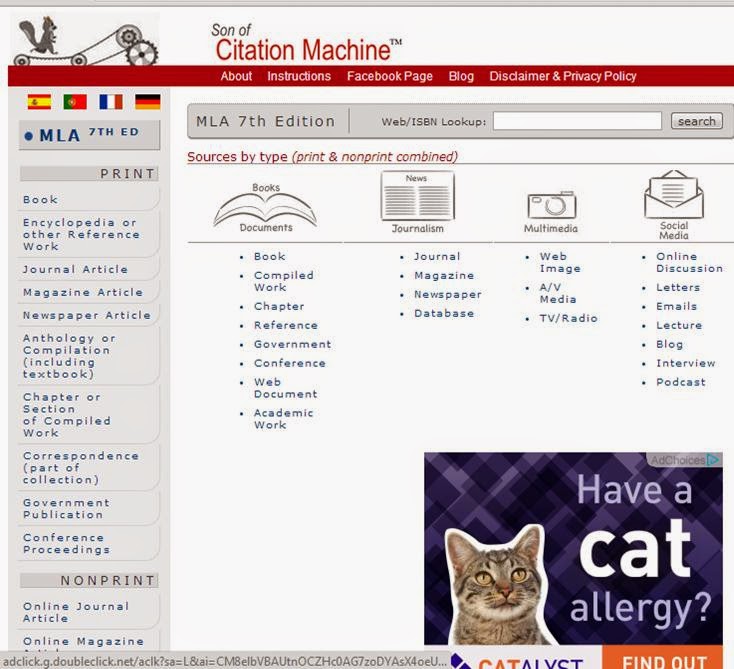
Let's start, first of all with Citation Machine. I have relied on this site for a very long time. I was introduced to it about 5 years ago by it's developer David Warlick. I started using it that following semester with my students in Journalism when they wrote their papers about the history of Journalism.
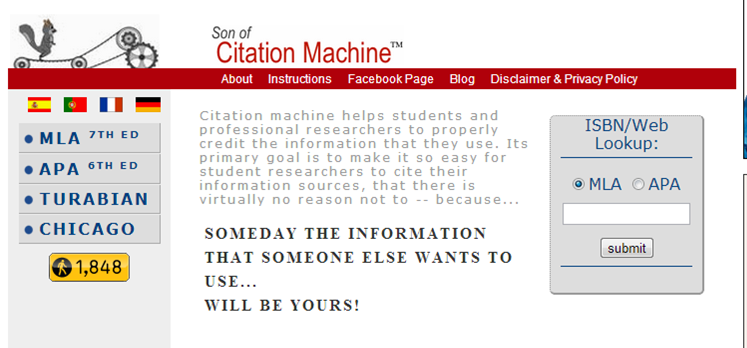
Citation Machine is very simple to use and it covers the basic types of paper styles, MLA, APA, Turabian and Chicago. It offers users a large amount of sources. It doesn't take much to get the information needed either. It even allows the user to plug in the ISBN of a book and choose APA or MLA and voilà , there is the citation.
Yes, using a site like this isn't going to help kids learn how to cite sources on their own, but, it does it correctly. Some English teachers go through the process, show kids how to do it on their own and then have them check their citations with sites like this. As a non English teacher, this is the logical way for me to get kids to do their citations.
There is so much available information for kids to access and so many things they can do to make their papers correct. It's a no brainer!
Next in the series: OWL, the Purdue learning lab to cite sources.
Tuesday, October 8, 2013
Citing Sources Part 1: More on facts.
In my last post, I mentioned a few sites where I send kids to learn about copyright and fair use. This is part two. I spend a lot of time in class talking to kids about fair use. I often start off giving examples of scenarios and asking kids if they think the issue is legal or illegal. It's surprising how many of the kids think things are legal! (By the way, this is a great way to use polling software to get results and collect data. You could even do a pretest- post test of the materials to see what kids have really learned.)
One of the places I send kids is readwritethink.org. Although it is a site developed by the National Council of Teachers of English and not a librarian site, it is a fantastic go to site for teaching copyright (and anti-plagiarism). Upon visiting the site, you can search for copyright in the search bar and find over 50 lesson plans to help you teach the topic to various grades. This is a great tool for English teachers but also anyone who teaches the rules of copyright and plagiarism. I often pull a few of the lessons and do them with the kids. There is often a lot of discussion when I do the lessons.
The copyright alliance education foundation has a great copyright quiz I have used time and again to get kids thinking about the rules and laws. The site has a plethora of materials for teachers to use in their classrooms. There is a comprehensive program for teachers as well as lesson plans. The tools here are excellent for teaching kids how to follow rules and guidelines about copyright. This is a good starting point for a classroom teacher focusing on the topic. The site is lacking information about fair use, however.
To teach students about this, I visit the Stanford Copyright and Fair Use Center. Here, I find a lot of direction and information to share with kids about fair use. I really get them thinking about some of the rules. The discussions we have had have lead the kids to question a lot of things they face daily. They have learned a lot of information but they start thinking about things, which is what I want to see happen.
Copyright with Cyberbee is a little more elementary, but if you are working with middle school kids, it may help get the point across. It has a bunch of questions you can click on and learn the answer. I see success with grades 6-8 here, and no so much with high school, but, I have added it to my bag of tricks when the middle school kids walk through my door.
Finally, Richard Byrne also has a fantastic amount of information on his site Free Tech 4 Teachers. He has information about everything, but, he has a nice site devoted to copyright. It's worth checking out.
The idea of teaching copyright and plagiarism and citations can be a little scary. Kids have no fear about what is right and wrong and it is our responsibility as teachers to make sure they follow the rules. Hopefully, my links will help make that happen.
Next in the series...Citation Machine as a way to help make the proper citation.
Friday, October 4, 2013
Citing Sources Part 1: Teaching the facts
When I started this series, I promised to share information about the tools I use in my classroom and the places I send my students to learn as much as they can about copyright. I have had a lot of success with my classes doing this. I have had kids question a lot of things that happen around the school when they come into class and start looking into things. Our research often leads to some excellent discussion about what is right and wrong and what they can do to prevent it from being done. I have turned kids into global citizens who know some things are not acceptable. We talk about public domain and I teach kids how to use Project Gutenberg and sites like it. Today, I am going to look at two sites I use to teach copyright. The plan is to have a few posts in the series about sites such as these.
When I send students out to do their research, one site where I send them is the Copyright Clearance Center Academic section. They are expected to watch a video there about copyright. It is free to use and I always see them leaving class with information they didn't know before. The title of the video: Copyright on Campus. They also have another video called Copyright Is that I asked them to view. This leads to some discussion in class and I feel the kids are a little more aware of the right way to handle things.
Another place I visit is Teaching Copyright. This site features actual lesson plans about the topic as well as tools and resources that can be used. There is a quiz, FAQ pages about Fair Use, Copyright in general and Public Domain. It is loaded with great information that can be pulled into the classroom and used as a means of teaching students the right way to handle information. This site is not really geared for students to visit, it is more informative for the teacher. I still feel there is a lot of things here for kids to be taught.
My next post, a few more places to direct students. Check back soon!
Tuesday, October 1, 2013
Citing Sources: The Series
It is so important to get kids to understand citations, giving credit, plagiarism, and on and on. There are numerous people who handle that role, the teacher, peers, the administration, and me: the librarian. It is my duty to make sure kids are taking notes, citing their sources and paraphrasing what they have to say. I decided to do a series of posts on this topic and include several citation specific sites students can use to make their research better than ever.
First of all, let's focus on citation, what it means and where to go to learn as much as possible about it.
Back in the day, I used to teach a library media class. I suspect after my French classes are gone and I am a little more open with a schedule, I will get to work with junior high and teach this class again. I think it is important and necessary. The focus I always spent on library media was the research. What goes with it? Citations. I always started the class off with a short pre test asking numerous questions regarding legality and morality questions. (When I say morality, I am referring to other people's work and not other more personal things.)
I spend a lot of time talking about copyright and plagiarism. I make them read articles from different magazines about lawsuits and expulsions because of honor codes and copyright violations. We spend a lot of time discussing the fair use laws. When they leave my class, I hope they question some of their decisions.
The point I want them to take is that it is wrong to use people's thoughts without citing the source. There are a few places I send them to do a little research about citiations, copyright and deciding how to handle a citiation. In this series on my blog, I plan to spend a little time going over each place. I feel so strongly about this topic that this could be a long series, so don't get frustrated that I go over the topic several times.
So, what is next? Where I send kids to find information about copyright and citing sources, part one. We are going to look at the Copyright Clearance Center, Teachingcopyright.org, readwritethink.org, The copyright alliance education foundation and copyright with cyberbee. Richard Byrne also has a fantastic amount of information at his site Free Tech 4 Teachers Some of these sites even have an entire educational program created you can use. I decided to offer several and let readers choose the best one for them.
The second phase of the series will be looking at sites that help students cite their sources. There is a slew of them, but I am going to talk about the ones we use at our school. Stop back soon and check out parts one and two. Hopefully someone can benefit from this.
Friday, September 27, 2013
Pixton: A clever way to get them writing
Someone on twitter once mentioned that she used Pixton to practice writing. I had to check it out. I have used comic strip generators before, but I decided to nix them because they were a little boring and the final outcome was published online for many others to see. Pixton is a little different. It is very colorful and visual. There are numerous options for comic strip layout and it allows for foreign language symbols. I was really excited at how fast it went to complete a task.
I spent about ten minutes making a comic strip. I was able to manipulate the positions of the characters, add text and accents, and a cool background.
There is an educational version as well as a for fun account. (There is a 30 day trial, so if you are going to use it that way, make sure you get it when you need it so you don't lose the opportunity.) The for fun account posts the work on the web, so if you have students who do not have permission to post work online, don't use it, or print off a blank template and have the kids fill it in. I created the for fun account. It is free. The educator account is based on the number of kids. I have 9 students, so for me, it isn't worth $60/ year. I can add up to 20 kids for that price, but it isn't worth it to me. I see myself using it but not often enough to justify the cost.
Here is my quick comic to review lesson 1 in French 2: Quick and simple, and a great model for my kids. I think this program is very good for foreign language teachers. I also think it could benefit elementary teachers to address writing skills and it could be used as a means of identifying incorrect grammar. One could have grammatical or spelling errors and ask students to identify them. That is a way to make grammar fun.
So, if you are looking for a simple way to practice writing and do so in a funny and creative manner, check out Pixton. It is something different for your classroom.
Subscribe to:
Posts (Atom)